目次
Apricot データベースとモデル
— y2sunlight 2020-05-06
関連記事
- Apricot アプリ
- Apricot データベースとモデル
本章ではデータベースの設定とモデルの実装を行います。
データベースの構築
Apricotでは以下のユーザテーブルを持っています。
テーブル名 : user
カラム名 型 主Key 属性 説明 id integer ● autoincrement ID account text unique not null アカウント password text not null パスワード email text not null Eメールアドレス note text 備考 remember_token text 自動ログイン用 created_at text not null 作成日 updated_at text not null 更新日 version_no integer default 0 not null バージョンNo - ユーザ認証は(account,password)で行います
- remember_tokenは自動ログイン用の認証トークンです
- version_noは楽観的ロックで使用します
SQLファイル
Apricotではアプリ起動時にデータベースにテーブルが存在しない時、テーブルを自動生成します。テーブル作成用のsqlは以下のファイルに保存します。このファイルは後述のORMの初期設定ファイルで使用されます。
/apricot/assets/sql
- create.sql
/*
 * User Table
 */
CREATE TABLE IF NOT EXISTS USER
(
    id INTEGER PRIMARY KEY autoincrement,
    account text UNIQUE NOT NULL,
    password text,
    email text NOT NULL,
    note text,
    remember_token text,
    created_at text NOT NULL,
    updated_at text NOT NULL,
    version_no INTEGER DEFAULT 0 NOT NULL
);
SQLファイルについて
- SQLの文法及び使用できる関数などは使用しているデーターベース(Apricotでは
SQLite)に依存します。 - コメントは行コメント(
–Comment)とブロックコメント(/* Comment */)が使用できます。 - 文はセミコロン(
;)で区切って下さい。 - 連続する空白(
TAB,Space,改行文字)は1つの空白と同じにみなされます。
ORMの設定
設定ファイル
/apricot/config/setting
- idiorm.setting.php
<?php
return
[
    'sqlite' => [
        'db_file' => var_dir('db/apricot.sqlite'),
        'connection_string' => 'sqlite:'.var_dir('db/apricot.sqlite'),
        'caching' => true,
        'logging' => true,
    ],
    'initial_data' => [
        'user'=> [
            'exec' =>[
                'delete from sqlite_sequence where name=\'user\'',
            ],
            'rows' => [
                [
                    'account' =>'root',
                    'password' =>password_hash('', PASSWORD_DEFAULT),
                    'email' =>'root@sample.com',
                    'note' =>'Initial User',
                ],
            ],
        ],
    ],
];
- sqlite : 接続設定(apricotではSQLiteを使用します)
- sqlite.db_file — データベースファイルのパス (既定値は var/db/apricot.sqlite')
- sqlite.connection_string — 接続文字列
- sqlite.caching — キャッシングの有無
- sqlite.logging — ロギングの有無
- initial_data : 初期データ (テーブルが空の時に自動設定されます)
- {テーブル名} — ここではユーザテーブル( user )を指定しています
- exec — 実行したいSQLを記述します(複数指定可)
- rows — 行データを設定します(複数指定可)
接続設定の詳細は以下を参照して下さい:
https://idiorm.readthedocs.io/en/latest/configuration.html#id1
初期設定ファイル
データベースの設定は初期設定ファイルで行います。
/apricot/config/setup
- idiorm.setup.php
<?php
//-------------------------------------------------------------------
// ORM(idirom)の初期設定
//-------------------------------------------------------------------
return function():bool
{
    // データベースファイルの準備
    $db_file = config('idiorm.sqlite.db_file');
    if (!file_exists($db_path=dirname($db_file)))
    {
        mkdir($db_path,null,true);
    }

    // DBファイルの存在確認
    $new_db_file = !file_exists($db_file);

    // データベース接続
    ORM::configure([
        'connection_string' => config('idiorm.sqlite.connection_string'),
        'caching' => config('idiorm.sqlite.caching',false),
        'logging' => false,
        'logger' => function($log_string, $query_time)
        {
            // SQL debug logging
            \Core\Log::info("SQL",[$log_string]);
        },
    ]);

    //-------------------------------------------
    // テーブルの作成 (新しくDBを作った時)
    //-------------------------------------------
    if ($new_db_file)
    {
        $sql_text = file_get_sql(assets_dir('sql/create.sql'));
        if (!empty($sql_text))
        {
            foreach($sql_text as $sql)
            {
                ORM::get_db()->exec($sql);
            }
        }
    }

    //-------------------------------------------
    // 初期ユーザの作成 (ユーザテーブルが空の時)
    //-------------------------------------------
    $initial_data = config('idiorm.initial_data');
    if (isset($initial_data))
    {
        foreach($initial_data as $key=>$item)
        {
            if(ORM::for_table($key)->find_one()===false)
            {
                if (array_key_exists('exec', $item))
                {
                    // SQLの実行
                    $exec = (array)$item['exec'];
                    foreach($exec as $sql)
                    {
                        ORM::get_db()->exec($sql);
                    }
                }
                if (array_key_exists('rows', $item))
                {
                    // 新しいレコードの作成
                    $rows = (array)$item['rows'];
                    foreach($rows as $row)
                    {
                        $row = ORM::for_table($key)->create($row);
                        $row->set_expr('created_at', "datetime('now')");
                        $row->set_expr('updated_at', "datetime('now')");
                        $row->save();
                    }
                }
            }
        }
    }

    // SQLログ開始
    ORM::configure('logging' , config('idiorm.sqlite.logging',false));
    return true; // Must return true on success
};
初期設定ファイルでは以下の事をおこないます:
- データベースの保存フォルダが存在しない場合は作成します
- データベースへの接続
- テーブルの作成 (新しくDBを作った時)
- 初期ユーザの作成 (ユーザテーブルが空の時)
- SQLログの開始 (logging設定がtrueの場合)
アプリケーション設定の変更
上で作った idiorm.setup.php をアプリケーションの設定ファイル(app.php)に追加します。
/apricot/config
- app.php
<?php
return
[
    'setup' =>[
        config_dir('setup/whoops.setup.php'),    /* Error handler(whoops) */
        config_dir('setup/bladeone.setup.php'),  /* View template (BladeOne) */
        config_dir('setup/aliases.setup.php'),   /* Class aliases for view template and so on */
        config_dir('setup/idiorm.setup.php'),    /* ORM(idiorm) */
    ],
    'middleware' =>[],
    'auth' =>[],
    'csrf' =>[],
];
テスト実行
データベースファイル(apricot.sqlite)を作ってみましょう。ブラウザ上で以下のURLにアクセス、Apricotのホーム画面を表示して下さい。
http://localhost/ws2019/apricot/public/
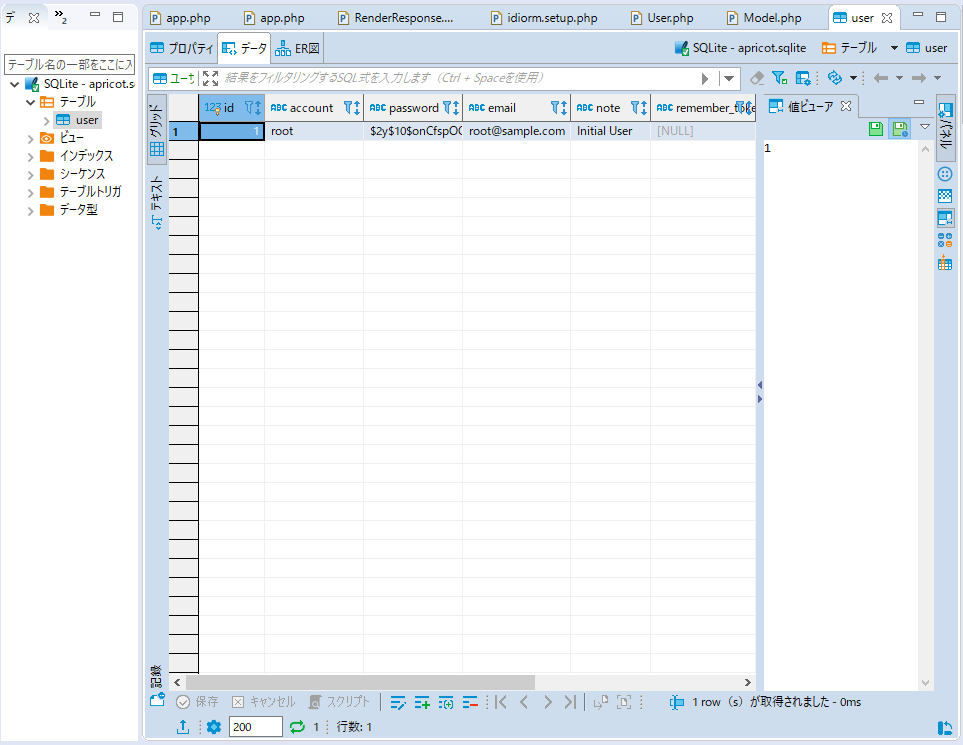
まだユーザ登録機能を実装していないので、アプリからユーザテーブルの内容を見る事はできませんが、以下の場所にデータベースファイルが作成されていることを確認して下さい。
/apricot/var/db/apricot.sqlite
Sqliteデータベースの内容を確認するには、A5:SQL Mk-2 などのデータベースクライアントを使用して下さい。また、Eclipseからデータベースの内容を参照したい場合は、DBeaverプラグイン が利用できます。
DBeaverプラグインのインストール方法
- メニューから[ヘルプ][新規ソフトウェアのインストール…]を選択
- [–すべての使用可能なサイト–]を選択
- [一般用ツール][マーケットプレース・クライアント]をインストール
- Eclipseの再起動
メニューから[ヘルプ][Eclipseマーケットプレース]を選択- [DBeaver]を検索してインストール
- Eclipseの再起動
DBeaverプラグインの使用方法
- メニューから[データベース][新しい接続]を選択して
apricot.sqliteに接続 - [ウィンドウ][ビューの表示][その他…]を選択
- [データベース][データベースブラウザ]を選択
データベースブラウザから- SQLite - apricot.sqlite をクリック
- SQLiteドライバー(jdbc)をダウンロード(初回のみ)
- [テーブル][user]をクリック

モデルクラス
ORマッパーが使えるようになったので、モデルのベースクラス( Model )を作ります。Modelクラスは必ず継承して使い、以下のメソッドを持ちます。詳しくはソースコードを参照して下さい。
メソッド名 機能 tableName()
:stringテーブル名の取得
テーブル名(snake_case)はクラス名(UpperCamelCase)から自動判定します。for_table()
:ORMORMオブジェクトの取得 findAll()
:array全件検索
ORMの配列を返します。findOne
(int $id):mixed主キー検索
見つかった場合は ORM を、それ以外は false を返します。create
(array $inputs=null):ORMモデルの新規作成 insert
(array $inputs):ORMレコードの挿入 update
($id, array $inputs):ORMレコードの更新
レコードが存在しない時、ApplicationExceptionが発生します。
楽観的ロック例外を検知した時、OptimissticLockExceptionが発生します。delete
($id):ORMレコードの削除
レコードが存在しない時、ApplicationExceptionが発生します。isSuccess()
:bool最新の更新結果を取得します(insert/update/delete) ソースコードを以下に示します。
/apricot/app/Foundation
- Model.php
<?php
namespace App\Foundation;

use ORM;
use App\Exceptions\OptimissticLockException;
use App\Exceptions\ApplicationException;

/**
 * モデル
 */
class Model
{
    /**
     * 最新の更新結果(insert/update/delete)
     * @var bool
     */
    private $success = false;

    /**
     * テーブル名の取得
     * @return string
     */
    public function tableName():string
    {
        return snake_case(get_short_class_name($this));
    }

    /**
     * テーブルの取得
     * @return \ORM
     */
    public function for_table():ORM
    {
        return ORM::for_table(snake_case(get_short_class_name($this)));
    }

    /**
     * 全件検索
     * @return array|\IdiormResultSet
     */
    public function findAll()
    {
        return $this->for_table()->find_many();
    }

    /**
     * 主キー検索
     * @param int $id
     * @return \ORM|false returna single instance of the ORM class, or false if norows were returned.
     */
    public function findOne(int $id)
    {
        return $this->for_table()->find_one($id);
    }

    /**
     * 新規作成
     * @return \ORM
     */
    public function create(array $inputs=null):ORM
    {
        return $this->for_table()->create($inputs);
    }

    /**
     * 新規保存
     * @param array $inputs
     * @return \ORM
     */
    public function insert(array $inputs):ORM
    {
        $row = $this->for_table()->create($inputs);
        $row->set_expr('created_at', "datetime('now','localtime')");
        $row->set_expr('updated_at', "datetime('now','localtime')");
        $this->success = $row->save();
        return $row;
    }

    /**
     * データ更新
     * @param mixed $id
     * @param array $inputs
     * @return \ORM
     */
    public function update($id, array $inputs):ORM
    {
        // ApricotではSQLite3.0.8以上の使用を前提としており、トランザクション分離レベルはデフォルト値がDEFERREDです。
        // DEFERRED は最初の読み取り時に共有ロックが掛かります(SQLiteのロックはデータベースロックです)。
        // 従って、version_no読み取り後はトランザクション終了まで他の更新は発生しません。
        // NOTE: 他のデータベースの場合は、ここで行ロックを取得してレコードの検索を行います(select for update)
        $row = $this->for_table()->find_one($id);
        if ($row===false)
        {
            throw new ApplicationException(__('messages.error.db.update'));
        }

        // 楽観的ロックの検証
        if ($row->version_no != $inputs['version_no'])
        {
            throw new OptimissticLockException();
        }

        // データ更新
        $row->set($inputs);
        $row->set_expr('updated_at', "datetime('now','localtime')");
        $row->set_expr('version_no', "version_no+1");
        $this->success = $row->save();
        return $row;
    }

    /**
     * データ削除
     * @param mixed $id
     * @return \ORM
     */
    public function delete($id):ORM
    {
        $row = $this->for_table()->find_one($id);
        if ($row===false)
        {
            throw new ApplicationException(__('messages.error.db.delete'));
        }
        $this->success = $row->delete();
        return $row;
    }

    /**
     * 最新の更新結果の取得(insert/update/delete)
     * @return bool
     */
    public function isSuccess():bool
    {
        return $this->success;
    }
}
ORMオブジェクトについては、以下のIdiormのドキュメントを参照して下さい: