目次
プロジェクトの作成 - Apricot (α版)
— y2sunlight 2020-03-17
関連記事
- プロジェクトの作成 - Apricot (α版)
開発環境
- XAMPP 7.3.15
- PHP 7.3.15 (VC15 X86 64bit thread safe)
Eclipse 2019-12 — PHP Windows 64bit版Composer 1.9.1プロジェクト名
- apricot
プロジェクトフォルダ
- D:\usr\ws2019\apricot\
ワークスペースの作成
プロジェクト(apricot)で使用するワークスペースを以下に作成します。
D:\usr\ws2019
Apacheの設定
{XAMPP Install Folder}\apache\conf\httpd.confhttpd.confの末尾に以下の内容を追加します。
# My project settings
Include conf/my-extra/*.conf
新しく、以下のフォルダを作成し、
{XAMPP Install Folder}\apache\conf\my-extraその中に以下の内容で、ファイル(ws2019.conf)を作成します。
- ws2019.conf
Alias /ws2019 "D:/usr/ws2019"
<Directory "D:/usr/ws2019">
  Options All
  AllowOverride All
  Require all granted
</Directory>
Apacheを再起動します。
Eclipseプロジェクトの作成
Eclipseを起動しワークスペース(D:\usr\ws2019)を開きます。
Eclipseの初期設定方法については、本編「Eclipse 2019-12のインストール」のワークスペースの設定を参照して下さい。プロジェクトの作成
メニュー[ファイル][新規][PHPプロジェクト]を選択します。
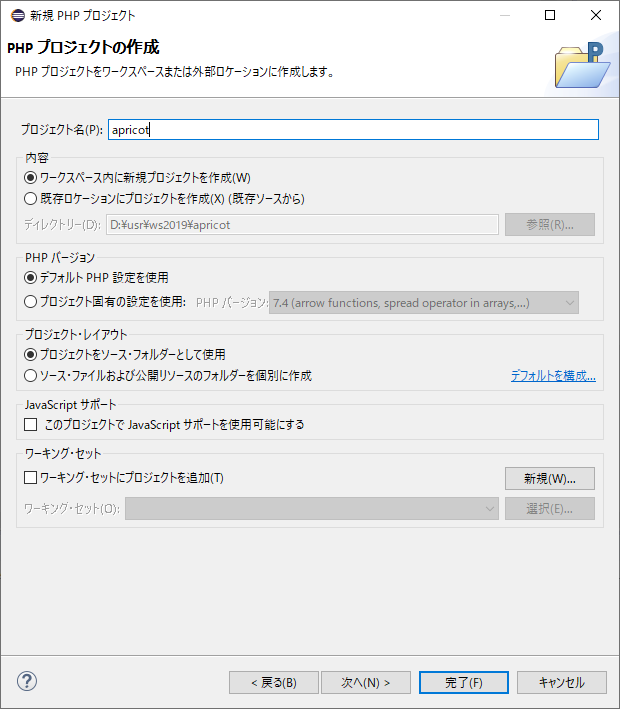
■ ここでは[プロジェクト名]にapricotを指定します。
■ [完了]ボタンを押して下さい。ビルドパスの設定
プロジェクトを右クリック[プロパティー]をクリックします。
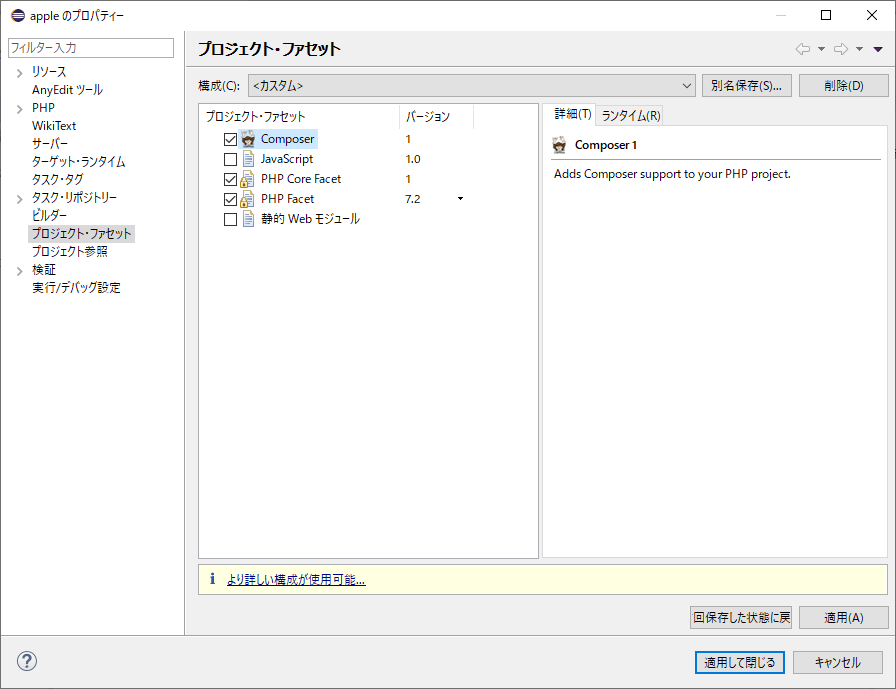
■[プロジェクト・ファセット][Composer]にチェックを入れ、[適用して閉じる]をクリックします。
その他のEclipseの設定
以下を参照してその他の設定を行って下さい。
Exlipseを終了します。
composerのインストール
ここでは、Composerをローカールインストールします。まずは、コマンドプロンプトを起動しプロジェクトフォルダ(D:\usr\ws2019\apricot)に移動して下さい。
以下のURLにアクセスします。
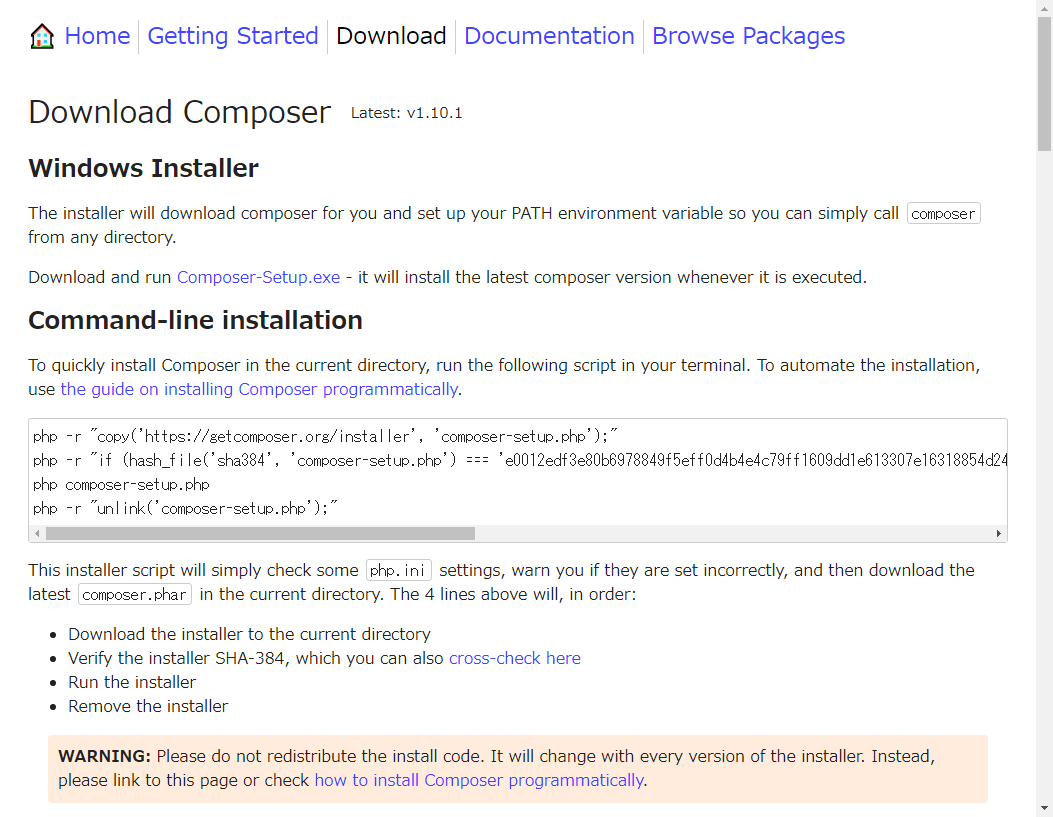
■
Command-line installation下にあるスクリプトをコピーして順に実行して下さい。- composer-local-installer.bat
php -r "copy('https://getcomposer.org/installer', 'composer-setup.php');"
php -r "if (hash_file('sha384', 'composer-setup.php') === 'e0012edf3e80b6978849f5eff0d4b4e4c79ff1609dd1e613307e16318854d24ae64f26d17af3ef0bf7cfb710ca74755a') { echo 'Installer verified'; } else { echo 'Installer corrupt'; unlink('composer-setup.php'); } echo PHP_EOL;"
php composer-setup.php
php -r "unlink('composer-setup.php');"
上のインストールスクリプト(composer-local-installer.bat)はインストーラ(composer-setup.php)毎に違うので、このまま実行しないで下さい。必ず、最新のスクリプトを取得してから実行して下さい。composerのインストールが終了したら、以下のコマンドでComposerのバージョンを確認して下さい。
D:\usr\ws2019\apricot> php composer.phar -V

Composer version 1.10.1 2020-03-13 20:34:27 --- 出力結果
次に、プロジェクトフォルダに composerコマンド(
composer.bat)を作成します。- composer.bat
@D:\usr\xampp7.3.15\php\php.exe "%~dp0composer.phar" %*
PHPはPATH環境変数で設定されているものではなくて、PHP 7.3.15を直接指定して使用しています。composerコマンドの動作確認の為に、
composer diagnoseを実行してみます。D:\usr\ws2019\apricot> composer diagnose Checking platform settings: OK Checking git settings: OK Checking http connectivity to packagist: OK Checking https connectivity to packagist: OK Checking github.com rate limit: OK Checking disk free space: OK Checking pubkeys: Tags Public Key Fingerprint: ******** Dev Public Key Fingerprint: ******** OK Checking composer version: OK Composer version: 1.10.1 PHP version: 7.3.15 PHP binary path: D:\usr\xampp7.3.15\php\php.exe OpenSSL version: OpenSSL 1.1.1d 10 Sep 2019
結果的に、プロジェクトフォルダに以下の2つのファイルをインストールしたことになります。
- composer.phar — phpスクリプト(Composer本体)
- composer.bat — batファイル(composerコマンド)
composer.jsonの初期化
Composerのインストールが出来たら、
composer initコマンドを実行します。D:\usr\ws2019\apricot> composer init Welcome to the Composer config generator This command will guide you through creating your composer.json config. Package name (<vendor>/<name>) [y2sunlight/apricot]: Description []: Sample Project Author [y2sunlight <y2sunlight@soffice.biz>, n to skip]: n Minimum Stability []: Package Type (e.g. library, project, metapackage, composer-plugin) []: License []: proprietary Define your dependencies. Would you like to define your dependencies (require) interactively [yes]? n Would you like to define your dev dependencies (require-dev) interactively [yes]? n { "name": "y2sunlight/apple", "description": "Sample Project", "require": {} } Do you confirm generation [yes]? D:\usr\ws2019\apricot>initコマンドが終わると、プロジェクトフォルダ内にcomposer.jsonを作成されます。- composer.json
{
    "name": "y2sunlight/apricot",
    "license": "proprietary",
    "require": {}
}
これでプロジェクトの準備ができました。